
Manual for YZ-48 China egg incubator
|
|
|
|
|
|
|
|
|
|
|
|
|

General Notes

● To reach best hatching result, please read the manual carefully before using
1- Package included 48 eggs incubator* 1, manual* 1, Power code socket protection foam* 1, power code* 1, water kettle* 1

2- Power cord socket

3- Ensure egg tray matched motor shaft connector (48&56 eggs incubator)

4- Ensure egg tray matched card slot of both sides(48&56 eggs incubator)

5- Connecting motor interdace(32 eggs incubator)

6- Ensure egg tray matched card slot of both sides (32 eggs incubator)

7- Ensure fan, temperature display, function keys, heater and keepworks well. Attention, put machine into foam after checking, then hatching. after checking. then hatching.if start hatenvironment temperature bellowed 20 0Cfor better warm keeping.

8- Add water to preheat the incubator 20-30 minutes after checking, then hatching.

8- Open black dust cover and add water to preheat the incubator 20-30 minutes after checking. then hatching.

UNPACKING AND SET UP
IT'S RECOMMENDED TO PERFORM MACHINE TEST BEFORE HATCHING EGGS IN CASE INCUBATED EGGS GO BAD. DO NOT PUT ANY EGGS INTO INCUBATOR WHEN TESTING.
1. Check that the incubator motor is connected to the controller.
2. Plug in the power cord.
3. No need to turn on the switch on the panel of the unit.
4. Temperature and humidity of this unit won't reach to the setting value when you newly plug in the power cord, and this unit will send out alarms of low temperature and low humidity.
5. Cancel the alarm by pressing any green button.
6. Unpack the incubator and fill the water channel will help to increase humidity gradually.(Warm water is preferred.)
7. The interval for egg turning is set at 2 hours. Please pay close attention to egg turning at first use. The eggs are gently rolled right and left by 45 degrees for 10 seconds and then at random directions. Do not put on the cover for observation.
1-8- Press reset button to check the automatic egg turning function.lt turns every two hours,lasting 10 seconds.
C. Settings
The incubator will turn eggs after pressing RESET button. Hatching time will be reset after long pressing RESET button. The factory default settings will be restored after simultaneously pressing RESET and ON/OFF switch.
a. Setting Temperature
The incubator temperature is set at 38 °C (100 °F) before shipment. User can adjust temperature according to the egg category and local climate. If the incubator cant reach to 380 C(1000 F) after working for several hours, please check:(l) the setting temperature is above 380 °C(1000 ℉) (2) the fan is not broken (3) the cover is closed (4) the room temperature is above 180C(64.40 F).
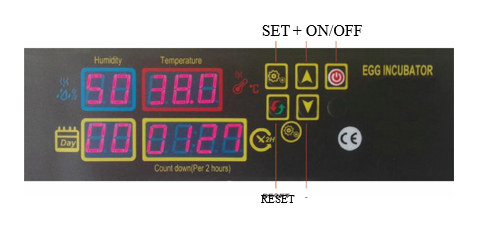
1- Press button "Set" once.
2- Press button "+" or "-" to set required temperature.
3- Press button "Set" to exit setting process.
4- Press the SET button and plug in at the same time to restore factory settings al. Setting Temperature Alarm Value(AL & AH)
The alarm value for high and low temperature is set at 1 °C (33.8 °F) before shipment.
For low temperature alarm(AL):
1. Press button "SET" for 3 seconds.
2. Press button until "AL" is illustrated on the temperature display.
3. Press button "Set".
4. Press button to set required temperature alarm value.
For low temperature alarm(AL):
The humidi to make any changes to these settings.
1. Press button "SET" for 3 seconds.
2. Press button until "AL" is illustrated on the temperature display.
3. Press button "Set".
4. Press button "+" or "-" to set required temperature alarm value.
For high temperature alarm(AH):
1. Press button "Set" for 3 seconds.
2. Press button "+" or "-" until "AH" is illustrated on the temperature display.
3. Press button "Set".
a2. Setting Upper & Lower Temperature Limits
For example, if the upper limit is set at 38.2 °C(100.8 ℉) while lower limit is set at 37.4 °C (99.3 ℉), the incubator temperature can only be adjusted within this range.
b. Setting Humidity(AS)
The humidity is set at 60% before shipment. User can adjust humidity according to the egg category and local climate.
1. Press button "Set" for 3 seconds.
2. Press button "+" or "-" until "AS" is illustrated on the temperature display.
3. Press button "Set".
4. Press button "+" or to set required humidity value.
The product will make alarm calls at low temperature or humidity. Re-set the temperature or add water will solve this problem.
c. Calibrating the Temperature Transmitter(CA)
The thermometer is set at O °C(32 ℉) before shipment. If it illustrates a wrong value, you should put a calibrated thermometer into the incubator and watch for the temperature differentials between calibrated thermometer and controller.
1. Calibrate the the transmitter dimension.(CA)
2. Press button "Set" for 3 seconds.
3. Press button "+" or "-" until "CA" is illustrated on the temperature display.
4. Press button "Set".
5. Press button to set required dimension.
D. Illustration
| Display | Description | Factory Setting |
|---|---|---|
| AL | Setting low temperature alarm | 1 °C (33.8 ℉ ) |
| AH | Setting high temperature alarm | 1 °C (33.8 ℉ ) |
| AS | Setting humidity | 60% |
| CA | Calibrating temperature transmitter | O °C (32 ℉ ) |
| HS | Setting upper temperature limit | 39.5 °C (103.1 °) |
| LS | Setting lower temperature limit | 30 °C (86 ℉ ) |
USING YOUR INCUBATOR
1. Test your incubator to make sure it works properly.
2. Connect the egg turner to the controlling plug in the incubation chamber.
3. Fill up one or two water channels according to your local humidity level.
4. Set the eggs with the pointy side down
5. Close the cover and start the incubator.
6. Press button "Reset" to set again, the "Day" display will count from 1 and egg turning "Countdown" will countdown from 1:59.
7. Keep an eye on the humidity display. Fill the water channel when there is a need.(Normally every 4 days)
8. Remove the egg tray with the turning mechanism after 18 days. Put those eggs on the bottom grid and chicks will come out of their shells.
9. It's important that fill up one or several of the water channels to increase humidity and get ready for hatching.
10. Do not open the lid for a long time when hatching, or it will slow hatching speed.
Incubating tips
The first step for hatching is choosing best fertilized eggs. Then how to choose?
1- Fertilized Eggs must be fresh and generally within 4-7 days after laying is the best. The best temperature for saving fertilized eggs is 10-15 °C. The fertilized egg is covered with a layer of powdery substance, which is strictly prohibited to put into fridge and wash.
2- The surface of egg shell is required to be no deformity, cracks or any spots.
3- There's no need to be very careful on disinfecting fertilized eggs. Do not go to disinfect if can't achieve disinfection condition because improper disinfection may reduce the hatching rate. Just make sure the egg surfaces are clean and no spots.
4- When putting eggs into machine for hatching, make sure the poninted side down.
5- Proper operation and careful observation are required during the incubation, Such as :add water to the machine every 1 to 2 days (it depends on the environment and the content of water inside the machine).
6- Fertile egg can't be tested by egg candler in the first four days during hatching, to avoid the incubator and egg surface temperature decline sharply affects the eggs' early development.
7- The first time to test egg (5 to 6 days) :mainly to check the fertilization of the eggs, select the unfertilized eggs, scattered yellow eggs, dead eggs.
The second time to test egg (11 to 12 days):mainly to check the development of egg embryo,the welldeveloped embryo is enlarged, with blood vessels inside, and the air chamber is large and sharply demarcated.
The third time to test egg (16 to 17 days):Light from the pointed side ,a well-developed embryo is larger, meanwhile full of egg, and no light in most places. If it's a dead egg,the blood vessels in the egg are blurred,Parts yellow near the air chamber,the bounda between the e and the air chamber is not clear .

8- Increase humidity and decrease temperature during hatching period , it prevents water from evaporating too quickly in the eggs.Most importantly ,increase humidity , prevent dehydration and reduce the temperature to avoid high temperature and high humidity, especially the hatching period last for a long time.And the temperature should be no more than 37.5 °C in 19th-21th days.
A. Egg and incubator hygiene
Proper hygiene is essential to achieve good hatching results. Poor hygiene causes chicks to die in their first 10 days of life.
Only clean eggs should be used for incubation. Dirty eggs are potential carriers of diseases that thrive and multiply in the ideal heat and moisture conditions of the incubator. If you need to incubate dirty eggs, wash them first in warm water (44-49 °C) that contains disinfectant at a rate recommended by the manufacturer (most household disinfectants are suitable), and dry the eggs quickly after washing using separate paper towels.
Do not soak eggs for longer than four minutes to avoid affecting fertility and do not soak eggs in cold water, as it encourages bacterial penetration through the eggshell.
B. Healthy stock
It is important that eggs from only a healthy flock are used for hatching, as some diseases can be transmitted through the egg. The egg-transmittable diseases to be most aware of are salmonella infections, fowl typhoid and Mycoplasma gallisepticum.
Eggs laid by birds infected with disease may fail to hatch. Of those that do hatch, some birds may die during brooding, and the survivors may act as carriers and infect healthy chicks.
Do not add eggs from unknown sources to make up numbers, as you risk infecting your flock.
Breeding stock nutrition
The egg provides a complete food store for proper embryo development except gaseous oxygen, which enters the egg through pores in the shell. Breeding stock must be fed a well-balanced diet to fully meet the embryos' nutrient requirements.
The deficient nutrients are usually vitamins or minerals. A deficiency of these in the breeders' diet may not show any ill effects in the breeders, though hatchability may be affected, which is why different categories are fed specific diets. Nutritional deficiencies, such as a lack of riboflavin, are the main causes of embryo mortality during the middle stage of incubation (i.e. between the 12th and 14th days).
Hens' vitamin and mineral requirements for laying eggs are lower than those of breeders. The breeder's diet should begin six to eight weeks before hatching eggs are required, with particular attention to vitamin A, D3, riboflavin, pantothenic acid, biotin, folic acid, vitamin B12 and the mineral manganese.
| Deficient nutrient | Result |
|---|---|
| Riboflavin | Leads to poor hatchability with a high incidence of malformed embryos, which are excessively moist |
| Pantothenic acid | Lowers hatchability and causes a high incidence of apparently normal embryos to die over the last two or three days of incubation |
| Biotin, choline and manganese | Leads to abnormal development of the embryo and a condition known as enlarged hock/slipped Achilles tendon |
| B12 | Leads to a rapid decrease in hatchability and a progressively poorer survival of chicks that do hatch |
C. Age of breeding stock
If the male bird is active, not too large or overweight, and fertile, then his age has little or no effect on hatchability or the vigour of the chicks. The older the cock bird, the fewer hens he can mate effectively without loss of fertility. Fertility and hatchability also decrease, as the hen's egg production drops with age, and is highest during her first and second laying season.
D. Hatching eggs selection
It is important to consider the size, shape and shell texture when selecting eggs for hatching. Best results are obtained by setting eggs that are around the average egg weight for the type of poultry.
Since egg size is highly heritable, the rejection of small eggs will help to maintain good egg size in the progeny. Extra large or small eggs are a handicap in the incubator. The egg shape is hereditary, so continual use of badly shaped eggs perpetuates and increases this fault.
Only eggs with good shell texture should be used for hatching. Shell texture is not heritable; however, weak-shelled eggs may crack, enabling bacteria to enter or excessive moisture to be removed from the egg. Porous-shelled eggs increase the rate of moisture loss during storage and incubation. Hair cracks that are too small for the naked eye to detect can be found by placing a strong light behind the egg. Egg colour does not affect hatchability.
E. First Season Eggs
Any fertile egg will hatch in the right conditions but "best practice" is to only hatch hen eggs of 12 months and older, even 12 month old hen eggs can be smallish depending on when she hatched. If a chook is hatched in August, Sept Oct, it will produce hatchable eggs at a younger age than one hatched in January Feb Mar. They will have matured and got their pullet size eggs over and done with through winter, whereas a January hatched pullet is too young to have started laying before winter therefore their pullet eggs won't start until Spring, BUT because they are older and stronger when they come into lay, their eggs get bigger quicker if that makes sense. Pullet eggs will produce small chicks and more often than not these will become smaller hens, who will in turn have smaller eggs who will have smaller chicks and so on.
In saying that the chicks seem to be just as healthy and if the eggs are a reasonable size I would just go for it, start adding meat bird crumble to their starter crumble at about 4 weeks old and that will give them a really good protein boost and they will grow better. Just don't hatch any very petite eggs.
F. Collection and storage of hatching eggs
Embryonic development continues if fertile eggs are maintained above 20 °C. Therefore, it is essential to collect eggs frequently and store them under cool conditions.
Eggs should be collected at least twice daily, and preferably three or four times. For best hatchability, eggs should be stored no longer than a week before setting.
The best temperature for storing hatching eggs is 10 to 16 °C. Storage humidity is also important. Humidity below 70 per cent causes the eggs to lose excessive moisture. Below are the correct wet-bulb readings for a given humidity at the storage temperature. If you do not have a specific cool room, store the eggs in a cool, dry place. Eggs stored under conditions where the temperature and humidity vary tend to start and stop incubation, resulting in pre-incubation and lower hatchability.
| Dry bulb | Welt-bulb-reading: 60% relative humidity | Welt-bulb-reading: 70% relative humidity | Welt-bulb-reading: 80% relative humidity |
|---|---|---|---|
| °C/℉ | °C/℉ | °C/℉ | °C/℉ |
| 10/50 | 6.8 | 7.4/45.3 | 8.2/46.7 |
| 11.1/52 | 7.6 | 8.3/46.9 | 9.3/48.7 |
| 12.2/53.8 | 8.4 | 9.4/48.9 | 10.5/50.9 |
| 13.3/56 | 9.6 | 10.6/51.1 | 11.4/52.5 |
| 14.3/57.7 | 10.7 | 11.5/52.7 | 12.1/53.8 |
| 15.3/59.5 | 11.5 | 12.2/54S | 13.3/56 |
G. Other factors affecting results
Rough or careless handling when transferring eggs to the hatching compartment or prolonged delays during transfer, resulting in chilling, may cause embryo deaths.
Excessive inbreeding of poultry may result in lethal or semi-lethal genes, which also cause mortality during incubation.
H. Consistent temperature
A hen's normal body temperature varies between 40.5 and 41.7 °C, depending on the bird and her degree of activity at the time. The optimum temperature at the centre of an incubated egg is approximately 37.8 °C. When hatching under a broody hen, the upper surface of the egg may reach 39.2 to 39.4 °C but the egg's centre will not exceed 37.8 °C.
In modern fan-forced incubators, the manufacturer's recommended temperature setting is between 37.5 and 37.64 °C. The lethal temperature for eggs is 39.4 °C. The constant and rapid air movement in this type of incubator keeps the eggs' temperature the same as the incubator's.
An embryo's heat production increases as incubation progresses. The temperature increase is greatest during the last two days due to embryo activity. Egg temperature rises up to 2 °C above the incubator's ambient air temperature, which is why the temperature is often lowered by up to 1 °C .
E. First Season Eggs
Any fertile egg will hatch in the right conditions but "best practice" is to only hatch hen eggs of 12 months and older, even 12 month old hen eggs can be smallish depending on when she hatched. If a chook is hatched in August, Sept Oct, it will produce hatchable eggs at a younger age than one hatched in January Feb Mar. They will have matured and got their pullet size eggs over and done with through winter, whereas a January hatched pullet is too young to have started laying before winter therefore their pullet eggs won't start until Spring, BUT because they are older and stronger when they come into lay, their eggs get bigger quicker if that makes sense. Pullet eggs will produce small chicks and more often than not these will become smaller hens, who will in turn have smaller eggs who will have smaller chicks and so on.
In saying that the chicks seem to be just as healthy and if the eggs are a reasonable size I would just go for it, start adding meat bird crumble to their starter crumble at about 4 weeks old and that will give them a really good protein boost and they will grow better. Just don't hatch any very petite eggs.
F. Collection and storage of hatching eggs
Embryonic development continues if fertile eggs are maintained above 20 °C. Therefore, it is essential to collect eggs frequently and store them under cool conditions.
Eggs should be collected at least twice daily, and preferably three or four times. For best hatchability, eggs should be stored no longer than a week before setting.
The best temperature for storing hatching eggs is 10 to 16 °C. Storage humidity is also important. Humidity below 70 per cent causes the eggs to lose excessive moisture. Below are the correct wet-bulb readings for a given humidity at the storage temperature. If you do not have a specific cool room, store the eggs in a cool, dry place. Eggs stored under conditions where the temperature and humidity vary tend to start and stop incubation, resulting in pre-incubation and lower hatchability.
TROUBLESHOOTING
| Probable causes | Action |
|---|---|
| (a) Wrong proportion of males to females | (a) Check mating ratios according to breeder’s recommendations |
| (b) Male is undernourished | (b) See that cockerels are able to feed separately, otherwise hens may eat all the feed |
| (c) Interference among males during mating | (c) Do not use too many males; always rear breeding males together; erect temporary solid partitions between breeding pens or inside large pens |
| (d) Damaged combs and wattles among males | (d) See that housing is comfortable and proper drinking fountains are provided for breeding pens |
| (e) Male is too old | (e) Replace old birds |
| (f) Male is sterile | (f) Replace with another male |
| (g) Eggs kept too long or under the wrong conditions before setting | (g) Do not keep hatching eggs longer than seven days; store them in a cool temperature (10-l5.6°C) at relative humidity around 75-80% |
| Probable causes | Action |
|---|---|
| (a) Incubator temperature too high or low | (a) Check thermometers, thermostats and electricity supply; follow manufacturer’s instructions |
| (b) Incorrect fumigation procedure | (b) Use the correct amount of fumigant. Do not fumigate between 24 and 96 hours after setting |
| (c) As in 1(g) | (c) As in 1(g) |
| Probable causes | Action |
|---|---|
| (a) As in 2(a) | (a) As in 2(a) |
| (b) Eggs not properly turned | (b) Check that all components and power cord are properly connected. And then press RESET for 3 to 5 seconds to observe if the eggs are ro erl turned. |
| (c) Breeding stocks' nutrition is deficient if deaths are high in days 10 and 14 | (c) Check that feeding is sound |
| (d) Incubator's ventilation faulty | (d) Increase ventilation by normal means |
| (e) Infectious diseases | (e) Use eggs only from healthy stock; check that hatchery hygiene is sound and carried out regularly |
| Probable causes | Action |
|---|---|
| (a) Insufficient moisture in the incubator | (a) Increase the evaporating surface of water or the sprays |
| (b) Too much moisture at earlier stages | (b) Check wet-bulb readings |
| (c) Nutrition problem | (c) Check flock feeding |
| Probable causes | Action |
|---|---|
| (a) Incubator's temperature too high | (a) Ensure the temperature regulating gear is working and set at the correct operating temperature when the control switches off |
| (b) Incubator's temperature too low | (b) Ensure the temperature regulating gear is working and set at the correct operating temperature when the control switches off |
| (c) Incubator's temperature probably too high | (c) Ensure the temperature regulating gear is working and set at the correct operating temperature when the control switches off |
| Probable causes | Action |
|---|---|
| (a) Incubator's temperature too high | (a) As in 2(a) |
| (b) Incubator's temperature too low | (b) As in 2(a) |
| (c) Eggs set incorrectly or not properly turned after setting | (c) As in 3(b); also, take care to set the eggs broad-end up; |
| Probable causes | Action |
|---|---|
| Hatching trays too smooth | use wire-meshed tray floors or cover slippery floors with burlap or other similar material |
| Probable causes | Action |
|---|---|
| (a) Incubator or hatching unit overheating | (a) As in 5 |
| (b) Setting small eggs | (b) Only set eggs of the breed average size |
| Probable causes | Action |
|---|---|
| (a) Too little moisture in incubator | (a) As in 4 |
| (b) Too much fumigant left in hatcher | (b) As in 2(b) |
| Probable causes | Action |
|---|---|
| (a) Too much moisture in hatcher | (a) As in 4 |
| (b) Possibly infectious disease | (b) Send chicks to a veterinary laboratory for diagnosis |
| (c) Low average temperature during period of incubation | (c) As in 2(b) |
| Probable causes | Action |
|---|---|
| (a) Incubator has poor ventilation | (a) Omphalitis (navel infection) |
| (b) As in 3(d) | (b) Carefully clean out and fumigate the incubator using formaldehyde at the higher strength; disinfect all equipment; |
| Probable causes | Action |
|---|---|
| (a) Setting eggs too diverse in age or size | (a) set eggs at least once a week and never retain hatching eggs longer than 10 days before setting; incubate only average-size eggs |
FAQ
Your eggs need to settle for at least 24 hours if they came through the post. This allows the air cell inside the egg to return to its normal size. Eggs should always be stored with the pointy end down while they are "in the hold". It's a good practice to follow and it will help your hatch!
If you receive eggs that are getting old, you may only let them settle overnight.
2. When is my incubator ready to start incubating?
By the time you have gotten your eggs your incubator should have been running at least 24 hours. A week is even better. This gives you time to learn what's going to happen in your incubator and allows you to make any necessary adjustments before setting your eggs. A surefire way to ruin hatching eggs is to put them in the incubator without having it properly adjusted.
Take note of the term "internal" temperature. Don't confuse internal egg temperature with internal incubator temperature. The temperature in an incubator changes constantly, rising and lowering. The temperature inside the egg will be an average of this temperature swing in your incubator.
3. What must the temperature and humidity be inside my incubator?
This is plain and simple, yet the MOST important part of hatching.
Fan Forced incubator: 37.5 degrees C measured anywhere in the incubator.
Humidity: 55% for the first 18 days, 60-65% for the last 3 days in the hatcher.
4. Is my thermometer accurate?
Thermometers go bad. Keeping the temperature accurate can be a struggle, even with very good thermometers. A nice part about running a big incubator over an extended period is that you can tweak the temperature regardless of what thermometers tell you.
After the first hatch, you can raise or lower the temperature by what the hatch tells you. If they hatched early the temperature needs to be lowered. If they hatch late the temperature needs to be raised.
You can check your Thermometer this way. Keep notes on everything you do during the incubation period. As you learn you'll have these notes to look back on. They will be the most valuable tool that you can have. It won't be long until you can say "l know what happened, all I need to do is change this one little thing". Soon you will be able to make adjustments by knowing what to do, instead of guessing.
5. How do I check humidity?
Humidity is checked by way of a hygrometer (wet-bulb thermometer) in conjunction with a regular "dry-bulb" thermometer. A hygrometer is simply a thermometer with a piece of wick attached to the bulb. The wick hangs in water to keep the bulb wet (hence the name "wet-bulb thermometer"). When you read the temperature on the thermometer and hygrometer, you must then compare the readings to a chart to translate from wet-bulb/dry-bulb reading to "percentage humidity". From the relative humidity table, you can see.....
60% humidity reads about 30.5 °C on a wet-bulb at 37.5 °C .
60% humidity reads about 31.6 °C on a wet-bulb at 38.6 °C .
80% humidity reads about 33.8 °C on a wet-bulb at 37.5 °C .
80% humidity reads about 35 °C on a wet-bulb at 38.6 °C .
Getting your humidity to become as accurate as your temperature is nearly impossible. It is almost completely impossible with a small incubator. Try to get your humidity as close as you can, and you'll be fine. Just being aware that humidity is important, and trying to get the numbers to come in close will be a huge help to your hatch.
If you can hold within 10-15% things should turn out fine.
Temperature on the other hand, is CRITICAL. We hate to beat this point to death, but a small deviation in temperature (even a couple degrees) can and will ruin a hatch. Or, at least turn a potentially great hatch into a lousy one.
6. An important note about incubator humidity:
As seasons change, so goes humidity. When you are incubating eggs in January and February it will be very difficult to maintain a humidity that is as high as you like. That's because the outside humidity is so low. (Depending on where you live). By the same token, when you are incubating in June and July the outside humidity is usually much greater and the humidity in your incubator will most likely get much higher than you would like. Hatching problems will change as the season progresses. If you are doing things the same way in July as you were in January, you have to expect different results. All we are trying to say here is that your incubator humidity changes directly according to the outside humidity. Low outside, low in the incubator. High outside, high in the incubator. To adjust for these problems, you need to change the surface area of water in your incubator.
7. What is surface area?
Surface area is "the amount of surface of water exposed to air in your incubator". The depth of water has absolutely no bearing on the humidity in the incubator (unless the depth is zero). If the humidity is too low in your incubator, add surface area. Place another pan of water in the incubator, or some small, wet sponges. This will help. Alternatively you can spray the eggs with a fine mist. To decrease the humidity, remove surface area. Use smaller containers of water, or undo some of the things you've added.
8. How long will it take to incubate chicken eggs?
The incubation period for chicken eggs is 21 days. You should turn your eggs at least three times a day for the first 18 days, and stop turning after the 18th day (or use a hatcher if you have eggs from different days in the same machine). This allows the chick time to orient itself inside the egg before piping.
After day 18, KEEP THE INCUBATOR CLOSED except to add water. This will help bring the humidity up to help the chicks hatch. I know it will kill you not to open the incubator 1000 times when it's this close to hatch time, but it's not good for the chicks. If you haven't bought an incubator yet, invest the extra couple bucks in the picture window model. Then you can "see it all" without causing harm to your hatch.
General Tips About Egg Incubation
Correct incubation conditions are important for development and hatching of eggs. The required conditions vary considerably between species, and some species appear more exacting in their requirements than others. Minor deviations in correct temperature may lead to a slightly shortened or lengthened incubation period, while greater variation may cause failure to develop or hatch, or result in weak chicks. Incorrect incubation conditions have also been implicated in some developmental problems of neonatal birds.
In general, correct incubation conditions are most crucial early in incubation, with small variations being tolerated better by the embryo later in development. For this reason, eggs are sometimes left with the parents initially for seven to ten days until they have been "set" and transferred to an artificial incubator after this most crucial period, in the hope that the birds will then lay again. Alternatively, eggs are placed under a broody hen initially, before being placed in an artificial incubator. Both procedures may improve hatching success compared to complete artificial incubation.
Egg cleanliness is of vital importance; it has been shown that poor hygiene and dirty eggs may significantly reduce the percentage of eggs hatching successfully. It is important that the laying sites are clean as well as conditions following egg collection. Eggs cool down once laid, therefore the contents shrink and air is drawn into the egg: bacteria may be drawn in at the same time. Invasion of bacteria such as Staphylococcus spp., Salmonella spp. and Escherichia coli may lead to death of embryos or neonates. Eggs may be cleaner if they are collected immediately after laying rather than after they have been "set".
Eggs, which are deformed, should not be incubated or placed in incubator.
Eggs which are noted to be cracked at the time of collection are generally discarded, and grossly contaminated eggs may also be discarded at this time. If such eggs are particularly valuable, they should be separated from other eggs for incubation, due to the greater risk of infection.
Eggs which become cracked during incubation may be repaired, if the crack is small, with e.g. surgical grade cyanoacrylate glue, candle wax dripped onto the crack, nail varnish, correction fluid or sticky tape (it has been suggested that products containing acetone should be avoided, due to possible toxicity. Eggs which are cracked should be incubated in an incubator (not under parent or broody), with extra care taken in their handling and monitoring. It is important to ensure that the material used to cover the crack is applied to the minimum surface of the shell required to seal the crack. A thin layer of bone cement may be applied over a crushed area of shell and a hole in the shell may be repaired by gluing an appropriate piece if sterilized shell, parafilm, tissue or gauze over the defect. Care should be taken to avoid sealing over larger areas of the shell than absolutely necessary as this prevents necessary gaseous exchange.
If the shell membranes have been penetrated the egg is likely to have become contaminated with pathogens and the yolk, embryo or blood vessels may have been physically damaged. Hatchability is greatly reduced. A piped egg which is being parent or broody incubated and becomes damaged should be moved to a hatching incubator.
Records: Accurate and detailed records are very important in incubation. All eggs should be individually identified and details recorded including the identity of the parents, and details of their pedigree, nutrition and breeding and incubation behavior, initial weight, date of setting, details of incubation such as results of candling, incubator used, weight loss (if this is being monitored) expected and actual hatching dates, as well as evaluation of the hatched chick or results of investigation into eggs which fail to hatch.
Parent incubation generally provides the ideal conditions of temperature and humidity for development and hatching. However, not all species or individuals are equally good sitters, particularly in captive situations, in which birds may be disturbed and not feel secure. Additionally, small species in particular are vulnerable to predation while sitting, especially if nesting in an open site. Also, normal incubation behavior may not be suitable for birds being maintained in an environment very different from their native habitat.
If allowed to sit, hatch and rear their chicks, most birds will produce only one clutch a year, whereas two, three or even more clutches of eggs may be produced if the eggs are removed.
It may be less easy to monitor parent-sat eggs for fertility and continued development, with an attendant risk of disturbing the birds.
In captive conditions it may be more likely that nesting materials will not be fresh and clean, but contaminated with droppings, or include mouldy vegetation.
